6-Step Preview
- Slow the spread of seedrain - Cut ivy off trees. Control holly, laurel, hawthorn, and other invasive trees.
- Reduce lawns, ivy, and blackberry - Thoroughly eradicate infestations to reduce plant maintenance later. This may take two years of repeated efforts. But first preserve intact native areas and work outward. If you are on a steep slope, get professional advice and proper permitting to avoid erosion and landslides.
- Mulch and amend soil - Spread arborchips on top of bare soil. Dig 25% woody matter into soil when planting (call before you dig: 811). Make your landscape more "sticky" by creating swales (unless near a steep slope) to retain water, and place nurselogs and branches cross-slope to slow runoff and capture leaves. Avoid cutting trees, but at least retain stumps at safe heights as wildlife snags, leaving roots in the ground to build soil.
- Favor native evergreen species (groundcovers, shrubs, and trees) to intercept stormwater and shade out weeds. Include dozens of evergreen and deciduous native species for habitat diversity and resiliency.
- Create space for pollinators - "leave the leaves" and messy areas (twigs and branches) with bare-soil access for ground-nesting pollinators (unless in a fire-safe zone near structures). Plant pockets of pollinator-friendly flowering plant species.
- Monitor and maintain - Manage sun exposure and weed competition to maximize native plant establishment.
Steps in Detail
 "Frill," with overlapping cuts, or "saw-frill" around the entire circumference, applying herbicide to the cambium layer between the bark and the sapwood.
Step 1:
Slow the spread of invasive “seed rain” and prolong the life of mature trees
• Cut invasive vines on trees — This is the single highest priority measure to slow the spread of English ivy and save your trees. Ivy bears fruit when it grows vertically, changing leaf shape before it flowers and sets seed. Cutting ivy "survival rings" around a tree any time of year is good, but May/June timing is best when sap is flowing. This bleeds out root reserves and dries the top vines in summer.
* Cut other invasive vines: wild clematis, Japanese honeysuckle, or bindweed/morning glory in a ring around the tree, at chest height.
Note: Chainsaws can damage and kill trees. Use loppers, a handsaw and prying tool (always use eye-protection).
* Leave the vines above the cut to wither (don’t remove vines - it can injure the tree and also you from falling debris.) For tree hygiene, after cutting vines at chest height, also cut vines at the base of the tree, removing this section of vines between the cuts, taking care not to damage the sensitive base of the tree. This old-school recommendation also suggests removing ivy in at least a three-foot radius around the tree. Wear a hardhat, eye protection, and gloves to help avoid risks of falling limbs or debris from the tree.
* Note: Removing ivy intertwined with tree roots is difficult without damaging the tree. It requires prolonged maintenance or sheet mulching to starve the ivy roots. If working on a large infestation, seek licensed professional help to treat larger vines with an appropriate herbicide (injections or cut-stump/cut & dab treatments with imazapyr or triclopyr, on dry days September through December, perhaps longer into late winter shoulder seasons), and to spray ground ivy at least 5 ft around trees to slow the ivy's re-establishment in trees, if not treating the entire site. For cost-effectiveness, "fast ivy rings" entails one cut around a tree, herbicide-treating the vines both above and below the cut to prevent the upper vine from setting seed. Otherwise, seed production can still happen after severing vines due to the plant's ability to glean water from the canopy, particularly in the rainy winter season.
For large patches of prostrate (ground) ivy, spraying may be the best option to avoid erosion, utilizing professional, licensed applicators skilled to avoid “drift” to valuable native plants, who apply minimal amounts of proper herbicides wearing safe PPE. This is the environmental “best practice” for monocultural “ivy-deserts.” Smaller patches may be hand-pulled or "knocked-down" with a string trimmer, then smothered with 8 - 12 inches of arborchips (but not necessarily this deep on a slide-prone slope). Restoration professionals can minimize soil disturbance and erosion by using appropriate combinations and dilutions of herbicides and surfactants to help retain vegetative roots and topsoil, particularly important on a slope (seek qualified geotechnical advice if your property is deemed an "Environmental Critical Area" where erosion protection fabric or other measures may be recommended).
* If manually removing ivy, air-dry any viable vines out of contact with the soil (on brush piles or snags) to avoid re-rooting, and be sure to mulch any bare, disturbed soil with arborist woodchips 2 -6 inches, as long as added weight of mulch doesn't exacerbate landslide issues. Avoid landscaping bark – it repels water and does little for soil health). See the demo above of a practitioner cutting ivy rings. For professionals wanting to contribute to evolving ivy control practices, consider the perspective detailed in this draft document on ivy control.
• Eradicate woody invasive trees and shrubs — Invasive trees (in the Northwest) include English holly, English laurel, Portuguese Laurel, European hawthorn, European mountain ash, bird cherry, domestic plums, etc.. Invasive shrubs include Scotch broom, spurge laurel, and Butterfly bush. Consider licensed, professional herbicide applications to retain roots to maintain wood in the soil – important for fungal-plant associations – and to prevent soil erosion on critical slopes. These trees may be topped or girdled to reduce seed production, but kept alive for soil-binding attributes until the roots of native plants supplant the roots of invasives.
For more information about invasive tree identification, consult King County Noxious Weeds.
Hand pull small (less than pencil-size) saplings, if you’re certain roots can be removed fully intact. If any roots break off, be prepared for repeated maintenance of root suckers. This often happens in dense or clay soil where roots easily break off.
For larger trees, use one of these methods:
Organic method: Girdle the tree by peeling a foot of bark, at chest height, from around the circumference. Do this in the spring, May and June, when the bark is “slipping” (sap is flowing). Organic methods may not work for certain species prone to root suckering, like holly and black locust, but this may work on small sites that are easily monitored and maintained. You may also cut an invasive tree in June (before it leafs out and photosynthesizes energy) at head height, letting it resprout on top, then cut another 6 inches off every June to prevent seeding and weaken the plant.
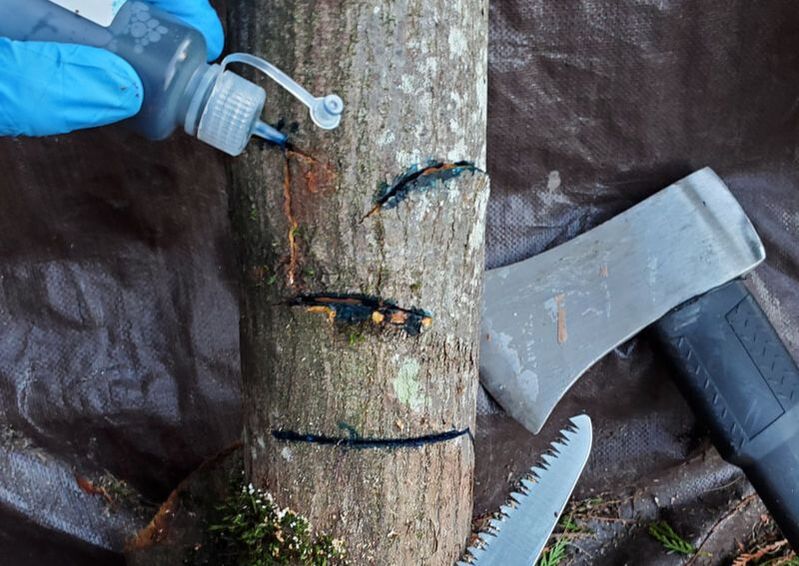
Herbicide method: If the tree is less than three inches in diameter, saw the tree to a stump (“cut-stump”) and apply herbicide to the entire cut area. If it is larger than three inches, “frill” it: chop (with overlapping cuts) into the cambium, or saw-frill a quarter-inch cut around the circumference. Either way, apply herbicide (per product label) to the cambium layer of the fresh cut. The cambium is not the center heartwood, but is near the outside bark, between the bark and the sapwood. Summer to late fall is usually the best time to do this, when sap flow is toward the roots. If the cut is exuding juices, the treatment is too early and won’t translocate herbicide to the roots.
∗ Hire a licensed herbicide professional—to be sure the herbicide is handled properly and is correctly applied to the cambium layer inside the bark. A common mistake when frilling with an ax is that the herbicide gets applied to the cut’s “cup” in the sapwood, missing the critical vascular cambium layer just inside the bark. Note: Cut-stump or frill application methods often require (per legal label) application of a concentrated product that has 20-50% (a.i.) active ingredient (Note: many retail ready-to-spray foliar products have only 2% a.i.). Aquatic-licensed applicators are able to purchase injection shells or wetland-safe herbicides and surfactants vetted by the Dept. of Ecology, products deemed safe for fish and amphibians.
*Herbicide-licensed professionals are trained for safe handling of herbicides (nitrile gloves, safety glasses, respirator, long sleeves/pants, rubber boots), and for careful applications (low pressure pump sprayer that avoids fine mist, or exacting dropper bottles for targeted treatments) to avoid herbicide drift that can damage adjacent plants. Most applicators put food coloring in the herbicide product to track applications and highlight inadvertent skin exposure, which is immediately washed off. The science suggests such exposures are relatively non-toxic, but nonetheless, professionals aim for zero exposure. Please consider risk assessments the Herbicide Info page on this website.
What to do with the treated or cut vegetation?
If possible, keep all organic matter on-site unless diseased or an egregious invasive seed source. Some species readily re-root when cuttings contact moist soil. Keep girdled or treated trees (particularly holly) upright until they die, leaving them as snags for wildlife habitat (reducing height if they’re a hazard). If there is potential for wildfire, cut dead trees (ladder fuels that risk crown fires) for nurselogs or “habitat piles” (logs on bottom, criss-crossed, with branches on top) to give small birds safe places to nest and forage. Retain messy areas in your yard with debris partially over bare soil for ground-nesting pollinators. If you are in wooded areas where fire is a possibility, don’t leave habitat-piles in the safe zones near a home, and consult/cooperate with forestry experts (Conservation Districts) for fuel reduction efforts. Consider the trade-offs between piles (less chance of fire spreading) and sheet-mulching (better soil protection to reduce erosion).
∗ Mulch-cut blackberry typically does not re-root and can also be left in place as sheet mulch.
*You can also speed soil building by cutting dead branches to shorter lengths for more ground contact, creating small non-contiguous "habitat" piles, or mechanically chipping debris and sheet mulching woodchips for faster fungal breakdown, less fire-prone if applied during fall and winter moist seasons.
*On slopes with the advice of a geotech, spread woody debris as sheet mulch or arrange cross-slope as “windrows” to slow water and retain autumn leaf drop across the slope to improve soil building and water retention. Don’t concentrate yard waste piles on natural area slopes – it will introduce weed seeds. Too much weight with yard waste or mulch can potentially cause landslides.
Slow the spread of invasive “seed rain” and prolong the life of mature trees
• Cut invasive vines on trees — This is the single highest priority measure to slow the spread of English ivy and save your trees. Ivy bears fruit when it grows vertically, changing leaf shape before it flowers and sets seed. Cutting ivy "survival rings" around a tree any time of year is good, but May/June timing is best when sap is flowing. This bleeds out root reserves and dries the top vines in summer.
* Cut other invasive vines: wild clematis, Japanese honeysuckle, or bindweed/morning glory in a ring around the tree, at chest height.
Note: Chainsaws can damage and kill trees. Use loppers, a handsaw and prying tool (always use eye-protection).
* Leave the vines above the cut to wither (don’t remove vines - it can injure the tree and also you from falling debris.) For tree hygiene, after cutting vines at chest height, also cut vines at the base of the tree, removing this section of vines between the cuts, taking care not to damage the sensitive base of the tree. This old-school recommendation also suggests removing ivy in at least a three-foot radius around the tree. Wear a hardhat, eye protection, and gloves to help avoid risks of falling limbs or debris from the tree.
* Note: Removing ivy intertwined with tree roots is difficult without damaging the tree. It requires prolonged maintenance or sheet mulching to starve the ivy roots. If working on a large infestation, seek licensed professional help to treat larger vines with an appropriate herbicide (injections or cut-stump/cut & dab treatments with imazapyr or triclopyr, on dry days September through December, perhaps longer into late winter shoulder seasons), and to spray ground ivy at least 5 ft around trees to slow the ivy's re-establishment in trees, if not treating the entire site. For cost-effectiveness, "fast ivy rings" entails one cut around a tree, herbicide-treating the vines both above and below the cut to prevent the upper vine from setting seed. Otherwise, seed production can still happen after severing vines due to the plant's ability to glean water from the canopy, particularly in the rainy winter season.
For large patches of prostrate (ground) ivy, spraying may be the best option to avoid erosion, utilizing professional, licensed applicators skilled to avoid “drift” to valuable native plants, who apply minimal amounts of proper herbicides wearing safe PPE. This is the environmental “best practice” for monocultural “ivy-deserts.” Smaller patches may be hand-pulled or "knocked-down" with a string trimmer, then smothered with 8 - 12 inches of arborchips (but not necessarily this deep on a slide-prone slope). Restoration professionals can minimize soil disturbance and erosion by using appropriate combinations and dilutions of herbicides and surfactants to help retain vegetative roots and topsoil, particularly important on a slope (seek qualified geotechnical advice if your property is deemed an "Environmental Critical Area" where erosion protection fabric or other measures may be recommended).
* If manually removing ivy, air-dry any viable vines out of contact with the soil (on brush piles or snags) to avoid re-rooting, and be sure to mulch any bare, disturbed soil with arborist woodchips 2 -6 inches, as long as added weight of mulch doesn't exacerbate landslide issues. Avoid landscaping bark – it repels water and does little for soil health). See the demo above of a practitioner cutting ivy rings. For professionals wanting to contribute to evolving ivy control practices, consider the perspective detailed in this draft document on ivy control.
• Eradicate woody invasive trees and shrubs — Invasive trees (in the Northwest) include English holly, English laurel, Portuguese Laurel, European hawthorn, European mountain ash, bird cherry, domestic plums, etc.. Invasive shrubs include Scotch broom, spurge laurel, and Butterfly bush. Consider licensed, professional herbicide applications to retain roots to maintain wood in the soil – important for fungal-plant associations – and to prevent soil erosion on critical slopes. These trees may be topped or girdled to reduce seed production, but kept alive for soil-binding attributes until the roots of native plants supplant the roots of invasives.
For more information about invasive tree identification, consult King County Noxious Weeds.
Hand pull small (less than pencil-size) saplings, if you’re certain roots can be removed fully intact. If any roots break off, be prepared for repeated maintenance of root suckers. This often happens in dense or clay soil where roots easily break off.
For larger trees, use one of these methods:
Organic method: Girdle the tree by peeling a foot of bark, at chest height, from around the circumference. Do this in the spring, May and June, when the bark is “slipping” (sap is flowing). Organic methods may not work for certain species prone to root suckering, like holly and black locust, but this may work on small sites that are easily monitored and maintained. You may also cut an invasive tree in June (before it leafs out and photosynthesizes energy) at head height, letting it resprout on top, then cut another 6 inches off every June to prevent seeding and weaken the plant.
Herbicide method: If the tree is less than three inches in diameter, saw the tree to a stump (“cut-stump”) and apply herbicide to the entire cut area. If it is larger than three inches, “frill” it: chop (with overlapping cuts) into the cambium, or saw-frill a quarter-inch cut around the circumference. Either way, apply herbicide (per product label) to the cambium layer of the fresh cut. The cambium is not the center heartwood, but is near the outside bark, between the bark and the sapwood. Summer to late fall is usually the best time to do this, when sap flow is toward the roots. If the cut is exuding juices, the treatment is too early and won’t translocate herbicide to the roots.
∗ Hire a licensed herbicide professional—to be sure the herbicide is handled properly and is correctly applied to the cambium layer inside the bark. A common mistake when frilling with an ax is that the herbicide gets applied to the cut’s “cup” in the sapwood, missing the critical vascular cambium layer just inside the bark. Note: Cut-stump or frill application methods often require (per legal label) application of a concentrated product that has 20-50% (a.i.) active ingredient (Note: many retail ready-to-spray foliar products have only 2% a.i.). Aquatic-licensed applicators are able to purchase injection shells or wetland-safe herbicides and surfactants vetted by the Dept. of Ecology, products deemed safe for fish and amphibians.
*Herbicide-licensed professionals are trained for safe handling of herbicides (nitrile gloves, safety glasses, respirator, long sleeves/pants, rubber boots), and for careful applications (low pressure pump sprayer that avoids fine mist, or exacting dropper bottles for targeted treatments) to avoid herbicide drift that can damage adjacent plants. Most applicators put food coloring in the herbicide product to track applications and highlight inadvertent skin exposure, which is immediately washed off. The science suggests such exposures are relatively non-toxic, but nonetheless, professionals aim for zero exposure. Please consider risk assessments the Herbicide Info page on this website.
What to do with the treated or cut vegetation?
If possible, keep all organic matter on-site unless diseased or an egregious invasive seed source. Some species readily re-root when cuttings contact moist soil. Keep girdled or treated trees (particularly holly) upright until they die, leaving them as snags for wildlife habitat (reducing height if they’re a hazard). If there is potential for wildfire, cut dead trees (ladder fuels that risk crown fires) for nurselogs or “habitat piles” (logs on bottom, criss-crossed, with branches on top) to give small birds safe places to nest and forage. Retain messy areas in your yard with debris partially over bare soil for ground-nesting pollinators. If you are in wooded areas where fire is a possibility, don’t leave habitat-piles in the safe zones near a home, and consult/cooperate with forestry experts (Conservation Districts) for fuel reduction efforts. Consider the trade-offs between piles (less chance of fire spreading) and sheet-mulching (better soil protection to reduce erosion).
∗ Mulch-cut blackberry typically does not re-root and can also be left in place as sheet mulch.
*You can also speed soil building by cutting dead branches to shorter lengths for more ground contact, creating small non-contiguous "habitat" piles, or mechanically chipping debris and sheet mulching woodchips for faster fungal breakdown, less fire-prone if applied during fall and winter moist seasons.
*On slopes with the advice of a geotech, spread woody debris as sheet mulch or arrange cross-slope as “windrows” to slow water and retain autumn leaf drop across the slope to improve soil building and water retention. Don’t concentrate yard waste piles on natural area slopes – it will introduce weed seeds. Too much weight with yard waste or mulch can potentially cause landslides.
Step 2
Remove or reduce lawn, ivy, and blackberry patches, at least enough to proceed with planting (Step 4).
• Two ways to remove a lawn:
1. Sheet mulch – cover grass with cardboard and wood chips: After your lawn/weed patch starts growing in spring, mow or string trim it, then add 1” of compost or fertilizer (optional), water if needed (avoiding runoff), then “sheet mulch” the lawn: cover it with cardboard overlapped one foot, or newspaper (six-plus pages thick... but not shiny-colored newsprint). Compost or light fertilizer encourages grass to “shoot” and expend its energy under the sheet mulch. Also pile on four to six inches of wood chips (up to a foot, if enough are available). Don’t sheet mulch in fall when grass has energy reserves to grow through cardboard softened by winter rains.
Avoid using landscaping fabric or bark as mulch. Fabric eliminates habitat for ground-nesting pollinators, and bark doesn’t feed the fungal food web that transports water and nutrients to help establishing plants survive. To get free wood chips, listen for tree services working in your neighborhood – the chipper is quite loud and crews are looking for a nearby drop spot. Or, sign up for cheap deliveries: https://getchipdrop.com/login/ connects arborists and gardeners, queuing requests according to supply and demand. Those willing to pay receive faster deliveries than those willing to wait for possible free deliveries.
2. Spray method: Hire a licensed professional to spray the grass with the proper herbicide (per product label)—usually a 2% a.i. dilution readily available at hardware stores. Broadleaf herbicides (triclopyr) do not work on grass (or any monocot like bamboo). For laypersons intent on using herbicide, read and follow the label, noting active growth period and avoiding (!) rainy periods or summer dormancy. Wear lung protection. Note conditions that are too windy, too hot, too cold, or too humid. To minimize risks of spray "drift," wipe the grass with an herbicide-soaked cloth or mop at foliar dilution. Professionals should be wearing PPE according to the label warnings: likely nitrile gloves, rubber boots, long-sleeved shirt, pants, lung and eye protection.
If laypersons are considering the risk tradeoffs of over-the-counter herbicides (like RoundUp), factor in comparative risks of engine exhaust from sod cutters or lawn mowers. For snapshot of professional perspectives, see this website's Herbicide Info page.
• Remove ivy patches: Four different methods offer tradeoffs to avoid herbicide, gasoline combustion, and topsoil loss:
1. Hand-pull the ivy. Cover exposed soil with wood chips, two to six inches deep, leaving 10%soil bare for ground-nesting pollinators.
3. Hire restoration practitioners to spray ivy deserts (greater than 80% ivy cover; less than 20% native cover) with a proper herbicide combination. Treated ivy is left in place on the ground as sheet mulch, helping avoid topsoil loss. If herbicide gets on the leaf of a native plant, the practitioner will cut the leaf from the plant. Depending on dry weather, the spray window is approx July – Oct 30. Late autumn sprays may not show die-off until the following spring. If you are worried about herbicide drift damaging native plants (groundcovers like ferns, fringecup, etc.), temporarily transplant them into pots, staging them in shady areas and watering appropriately. Transplant back into the landscape in late fall to winter planting season, after the herbicide has adequately dissipated (check the label for replanting intervals).
4. “Whip and drip:” Professional practitioners may string trim the ivy, immediately followed by a moderately-concentrated spray to get herbicide into scored stems.
*Experienced restoration professionals can avoid most herbicide damage to native plants, and minimize herbicide over-applications. Mild infestation may not be sprayable, requiring detail hand weeding.
If attempting a do-it-yourself home application, FOLLOW THE LABEL of over-the-counter products, and only apply herbicide when rain is not forecast in a three-day window.
• Follow these steps to remove Himalayan blackberry:
Organic method: 1) At flowering stage (when the plant has spent reserves), cut the blackberry to a six-inch height, leaving the stem-cuttings (in approximately one-foot lengths) as mulch. Keep cutting back (three times per year for 3 – 5 years minimum: approx. May, late June, Oct.) until evergreen plants help shade out regrowth (if you use a gas-powered string trimmer to “mulchcut,” note that engine exhaust may be more toxic than many herbicides). If you grub out roots, be sure to mulch the disturbed soil with wood chips. Any pulled roots or rooting tips of stems (white roots) need to be air-dried (on a “drying rack,” similar to a habitat pile). Be aware that manual removal of roots on a slope can cause serious soil damage and increase erosion or the possibility of landslides.
Chemical method: Dense, inaccessible blackberry patches may need mowing or brushcutting first (“knock-down” best timing is at flowering stage, June-ish), leaving cut stems (less than 1-foot lengths) on the ground as mulch. Then wait 4 – 6 weeks, and spray regrowth (after full leaf expansion) with a foliar dilution (approx. 2% a.i. active ingredient) of herbicide at least before early October (in Seattle climate). Blackberry flowers on 2-yr old stems, so spraying 1st-yr regrowth avoids pollinators.
Mild blackberry infestations with high proportions of native plants require targeted cut & dab methods on stems (after full leaf expansion, not during spring growth or drought dormancy, aim for July - Oct). “Cut & dab” hand methods apply concentrated herbicide (approx. 50% a.i.) across the entire cut, not missing the vascular tissues outside of the pith. Again, cut & dab won’t work during the spring flush when sap oozes from fresh cuts.
Pros and cons of spraying vs. “cut & dab”:
Disadvantages - 1) Indiscriminate spraying can kill beneficial plants if the operator is unskilled. 2) Spraying during flowering can kill pollinators. 3) Spraying during spring growth may not be effective. 4) Indiscriminate spraying without a mulching, replanting, and maintenance plan will leave bare soil prone to weed re-invasion. 5) Avoid knock-downs during bird nesting season (April – July), aiming to brushcut in shoulder seasons, March or August. Professionals are not always available in shoulder seasons, so managers may need to tolerate some “collateral damage,” knowing that the net gain for future habitat should offset temporary losses. With large infestation, stagger knock-downs in a piecemeal-patch scheme to avoid excessive nesting losses, in addition to careful monitoring of bird activity to locate nests.
Advantages of spraying – 1) Lesser amounts of herbicide may be used in a dilute spray vs. concentrated cut & dab of every stem. 2) After a blackberry knockdown and 4-6 weeks regrowth, other weeds may show themselves (bindweed/morning glory) and succumb to spraying, or, native plants may be visible after knock-down, indicating a more targeted herbicide method. 3) Spraying is more time and cost-efficient than single stem treatments or manual grubbing.
Remove or reduce lawn, ivy, and blackberry patches, at least enough to proceed with planting (Step 4).
• Two ways to remove a lawn:
1. Sheet mulch – cover grass with cardboard and wood chips: After your lawn/weed patch starts growing in spring, mow or string trim it, then add 1” of compost or fertilizer (optional), water if needed (avoiding runoff), then “sheet mulch” the lawn: cover it with cardboard overlapped one foot, or newspaper (six-plus pages thick... but not shiny-colored newsprint). Compost or light fertilizer encourages grass to “shoot” and expend its energy under the sheet mulch. Also pile on four to six inches of wood chips (up to a foot, if enough are available). Don’t sheet mulch in fall when grass has energy reserves to grow through cardboard softened by winter rains.
Avoid using landscaping fabric or bark as mulch. Fabric eliminates habitat for ground-nesting pollinators, and bark doesn’t feed the fungal food web that transports water and nutrients to help establishing plants survive. To get free wood chips, listen for tree services working in your neighborhood – the chipper is quite loud and crews are looking for a nearby drop spot. Or, sign up for cheap deliveries: https://getchipdrop.com/login/ connects arborists and gardeners, queuing requests according to supply and demand. Those willing to pay receive faster deliveries than those willing to wait for possible free deliveries.
2. Spray method: Hire a licensed professional to spray the grass with the proper herbicide (per product label)—usually a 2% a.i. dilution readily available at hardware stores. Broadleaf herbicides (triclopyr) do not work on grass (or any monocot like bamboo). For laypersons intent on using herbicide, read and follow the label, noting active growth period and avoiding (!) rainy periods or summer dormancy. Wear lung protection. Note conditions that are too windy, too hot, too cold, or too humid. To minimize risks of spray "drift," wipe the grass with an herbicide-soaked cloth or mop at foliar dilution. Professionals should be wearing PPE according to the label warnings: likely nitrile gloves, rubber boots, long-sleeved shirt, pants, lung and eye protection.
If laypersons are considering the risk tradeoffs of over-the-counter herbicides (like RoundUp), factor in comparative risks of engine exhaust from sod cutters or lawn mowers. For snapshot of professional perspectives, see this website's Herbicide Info page.
• Remove ivy patches: Four different methods offer tradeoffs to avoid herbicide, gasoline combustion, and topsoil loss:
1. Hand-pull the ivy. Cover exposed soil with wood chips, two to six inches deep, leaving 10%soil bare for ground-nesting pollinators.
- Health concern: Ivy-pulling stirs up irritating molds and dust, different from relatively rare ivy allergies that cause skin reactions. Woodchip piles also emit spores, usually causing mild congestion, on rare occasions causing breathing difficulties and hospitalization.
- Environmental consideration: Manual “organic” removal disturbs air pollution sequestered in soil, emulsifying and exacerbating stormwater toxins carried into nearby water bodies. Removal of topsoil/duff also reduces the interception and filtration of stormwater – the "number one polluter of Puget Sound."
- Ivy may regrow from root fragments.
3. Hire restoration practitioners to spray ivy deserts (greater than 80% ivy cover; less than 20% native cover) with a proper herbicide combination. Treated ivy is left in place on the ground as sheet mulch, helping avoid topsoil loss. If herbicide gets on the leaf of a native plant, the practitioner will cut the leaf from the plant. Depending on dry weather, the spray window is approx July – Oct 30. Late autumn sprays may not show die-off until the following spring. If you are worried about herbicide drift damaging native plants (groundcovers like ferns, fringecup, etc.), temporarily transplant them into pots, staging them in shady areas and watering appropriately. Transplant back into the landscape in late fall to winter planting season, after the herbicide has adequately dissipated (check the label for replanting intervals).
4. “Whip and drip:” Professional practitioners may string trim the ivy, immediately followed by a moderately-concentrated spray to get herbicide into scored stems.
*Experienced restoration professionals can avoid most herbicide damage to native plants, and minimize herbicide over-applications. Mild infestation may not be sprayable, requiring detail hand weeding.
If attempting a do-it-yourself home application, FOLLOW THE LABEL of over-the-counter products, and only apply herbicide when rain is not forecast in a three-day window.
• Follow these steps to remove Himalayan blackberry:
Organic method: 1) At flowering stage (when the plant has spent reserves), cut the blackberry to a six-inch height, leaving the stem-cuttings (in approximately one-foot lengths) as mulch. Keep cutting back (three times per year for 3 – 5 years minimum: approx. May, late June, Oct.) until evergreen plants help shade out regrowth (if you use a gas-powered string trimmer to “mulchcut,” note that engine exhaust may be more toxic than many herbicides). If you grub out roots, be sure to mulch the disturbed soil with wood chips. Any pulled roots or rooting tips of stems (white roots) need to be air-dried (on a “drying rack,” similar to a habitat pile). Be aware that manual removal of roots on a slope can cause serious soil damage and increase erosion or the possibility of landslides.
Chemical method: Dense, inaccessible blackberry patches may need mowing or brushcutting first (“knock-down” best timing is at flowering stage, June-ish), leaving cut stems (less than 1-foot lengths) on the ground as mulch. Then wait 4 – 6 weeks, and spray regrowth (after full leaf expansion) with a foliar dilution (approx. 2% a.i. active ingredient) of herbicide at least before early October (in Seattle climate). Blackberry flowers on 2-yr old stems, so spraying 1st-yr regrowth avoids pollinators.
Mild blackberry infestations with high proportions of native plants require targeted cut & dab methods on stems (after full leaf expansion, not during spring growth or drought dormancy, aim for July - Oct). “Cut & dab” hand methods apply concentrated herbicide (approx. 50% a.i.) across the entire cut, not missing the vascular tissues outside of the pith. Again, cut & dab won’t work during the spring flush when sap oozes from fresh cuts.
Pros and cons of spraying vs. “cut & dab”:
Disadvantages - 1) Indiscriminate spraying can kill beneficial plants if the operator is unskilled. 2) Spraying during flowering can kill pollinators. 3) Spraying during spring growth may not be effective. 4) Indiscriminate spraying without a mulching, replanting, and maintenance plan will leave bare soil prone to weed re-invasion. 5) Avoid knock-downs during bird nesting season (April – July), aiming to brushcut in shoulder seasons, March or August. Professionals are not always available in shoulder seasons, so managers may need to tolerate some “collateral damage,” knowing that the net gain for future habitat should offset temporary losses. With large infestation, stagger knock-downs in a piecemeal-patch scheme to avoid excessive nesting losses, in addition to careful monitoring of bird activity to locate nests.
Advantages of spraying – 1) Lesser amounts of herbicide may be used in a dilute spray vs. concentrated cut & dab of every stem. 2) After a blackberry knockdown and 4-6 weeks regrowth, other weeds may show themselves (bindweed/morning glory) and succumb to spraying, or, native plants may be visible after knock-down, indicating a more targeted herbicide method. 3) Spraying is more time and cost-efficient than single stem treatments or manual grubbing.
Step 3:
Mulching: Cover any bare or disturbed soil, and any perennial garden beds, with variable depths of arborists’ wood chips, one to six inches deep.
*Avoid using landscaping fabric or landscaping bark which repels water infiltration and does not feed the beneficial fungal mycelium needed for healthy soil and plants. A deep layer of woodchip mulch will improve soil and conserve moisture, while a shallow layer (less than 2”) may assist the germination of native seed banks. Bare soil or mulch less than 1” gives ground-nesting pollinators access to soil.
Deeper woodchip applications (4-12”) may be needed in damaged or drier soils, and to assist fungal-loving, rhizome-spreading plants like salal and snowberry.
∗ Note: Mulch on slopes helps survival of new plant installments, but too much may weigh the slope and cause slides. Avoid slope work during winter rains, normally from Nov 1 - Apr 1 (Halloween to April Fool’s Day). Hire an experienced professional for steep slope revegetation, with oversight from a qualified geotechnical engineer who may recommend planting during winter months, as long as erosion control fabrics and wattles/woody debris/coir logs are in place to prevent erosion from rain and foot traffic. Spot mulching around new plantings can be accomplished on steep slopes with woodchip-filled burlap bags, as an evaporation barrier and weed suppressant. Woodchips need to be applied before April to more effectively establishing beneficial fungi before soils dry out. Dense or clay soils may benefit from wooden stakes pounded to hold coir logs (not around utilities – call 811 for utility checks), helping plants tap into ground moisture transported by beneficial fungi, but check with your geotech for soil fracturing risks.
Professionals prefer solid coir (coconut fiber) fabrics to cover soil, rather than jute netting which is open to rain erosion. Deeper-rooted shrubs and trees are planted through “X’s” cut in the coir fabric, considered more important than any herbaceous groundcovers that may get smothered with fabric mulch. Still, there’s no substitute for groundcovers (like sword ferns) holding soil particles and providing vegetative cover, so those will be planted through the fabric and/or infilled after initial plant establishment.
Any wood, on or in soil, can be a “mycelium pathway.” While mushrooms are the fruit of the fungus, mycelium is the fungal body that is a live straw that gleans available water from volumes of ground moisture, and seeks out and shares the water and nutrients with a plant in exchange for photosynthesized sugars – a symbiotic relationship. Water may also come from a pond, stream, wet area of your yard, or a drip irrigation emitter. Mulching or placing wood between the water source and the plant can assist plant survival – this is the function of “nurse logs” with mycelium sometimes transporting water hundreds of feet away. “Nurse rocks” don’t necessarily support mycelium, but strategically placing available rocks next to new plantings has the benefit of reducing evaporation and suppressing weed competition.
Step 4:
Plant mostly evergreens at groundcover, shrub, and tree levels for weed suppression and stormwater interception.
Also, plant diverse deciduous varieties for wildlife and habitat diversity. Consult: (https://green2.kingcounty.gov/gonative/index.aspx and https://kingcd.org/wp-content/uploads/2023/10/KCD-Native-Plant-Descriptions-2024.pdf) for species suggestions suitable to your sun/shade/wet/dry conditions.
Short list of native evergreen groundcovers:
∗ Salal (can spread – slowly in most sites), Sword fern, Low Oregon Grape, Deer fern, Kinnikinnik, Trailing blackberry (in natural areas): plant 3-5 ft apart. Sword ferns in your yard may be divided in winter (look for ferns with separate fiddlehead clusters). Other herbaceous favorites (not all evergreen, but spreading): Wild ginger, Wood sorrel, native strawberries, Twinflower and Bunchberry (the latter two need well-rotted wood in the soil).
Short list of native evergreen shrubs:
∗ Evergreen huckleberry, Tall Oregon Grape, Pacific Rhododendron, Manzanita, California Myrtle, California Lilac, Silk tassel, common juniper: Plant shrubs approx. 7-10 ft apart for shading effects
Short list of pollinator-attracting plants (to supplement many of the above): Consult https://xerces.org/pollinator-conservation/pollinator-friendly-plant-lists ; and https://www.wnps.org/native-gardening/wildlife
∗ Groundcovers: Oregon Sunshine, Camas, native lupines, Philadelphia fleabane, yarrow
∗Shrubs: Oregon grape, Elderberry, Oceanspray, Ninebark, Ceanothus, Snowberry (spreading),
∗Trees: Cascara, Vine maple, Bigleaf maple, Serviceberry, Pacific crabapple, Oregon oak
Short list of clay-tolerant plants:
∗ Groundcovers: Swordfern, Fringecup
∗Shrubs: Osoberry/Indian Plum, Ninebark
∗Trees: Vine maple, Red alder, Western redcedar
Short list of evergreen trees (for large sites):
∗ Sun: Douglas fir, grand fir, Shore pine, Western White pine, Madrone (by seed is best)
∗Shade: Western red cedar, Western hemlock, Pacific yew, Sitka spruce, grand fir
∗Smaller yards: Mountain hemlock, Shore pine, Pacific yew
• Plant trees seven to twelve feet apart to establish shade (not all will survive. Thin later as needed for appropriate spacing 12-20 feet apart).
• Avoid sewer lines, gas lines, and electrical wires. (Call before you dig: 811; or 800-424-5555; or http://call811.com/)
• Plant in winter, October to March, the earlier/wetter the better.
For best results, the following planting instructions are optimal, but not always practical in remote sites.
Planting instructions for trees:
Smaller bareroot trees, 1-3 feet tall (available from wholesale nurseries or County conservation districts), are cheaper, and grow at a faster rate than larger, root-bound potted trees.
Careful Planting: Dig 2 or 3 holes such that an untouched mound of soil in the center (volcano) will prevent the root crown from sinking too deep into the hole. Make the holes wide and deep enough for the roots to spread out and go down without "J-roots," wide enough so you don't have to root-prune sensitive growing tips of roots. Put the soil you removed on a tarp or burlap, or better, in a bucket for “mudding in.”
∗ Set the crown of the plant on the mound in the hole (make sure the root crown is at ground level) and spread the roots down and out, the point being that primary roots need spreading for long-term structural stability (potted plants or trees started as test-tube “plugs” can be root bound and floppy). Avoid “J-roots” that double back, teasing crossing roots apart. Plant in the upper foot of soil, in the "sweet zone" that roots seek for both water and oxygen.
∗ Potted root-bound trees may need aggressive cutting and root manipulation, while structural root spread isn’t so important for most shrubs, and hardly at all for groundcovers. Some plant roots need to be handled more gently to retain mycorrhizal inoculants (like Western hemlock) or plants in the Heath family (salal, huckleberries).
∗ Fill the bottom of the holes with a 10% layer of rotting woody debris or wood chips and “mud in” with an approx. 80%soil / 20% woodchip mix, diluting with water for a consistency of wet cement, tapping the mud to get rid of air pockets around the wood chips (liquefaction like cement work). Again, wood in the soil helps build soil structure via mycelium (the fungal body) that supports plant growth, assisting tree survival during summer. A few handfuls of compost mixed in helps plant growth, but is not critical. Too much nitrogen makes plants tasty to pests.
∗ Mycorrhizal root dips, or “Plant Success Tabs” can kick-start beneficial fungi that needs the plant’s photosythesized sugars – a symbiotic relationship. There are mixed reviews about the need for these purchased products. However, transplanting native soils from intact forests can help introduce beneficial microbes. Woody matter and mulch in and on top of soil can help feed and sustain those microbes.
∗ “Mud in” plants only if the soil has high enough sand content to avoid drowning the roots with clay muck. Be cognizant of different soil layers that make up typical residential lots, where native loamy soil may be capped with compacted clay from excavated development. It’s difficult for water to penetrate through clay layers, even if soil below is more porous. A planting hole with uniform backfill may break through layers and make it easier for irrigation water to penetrate the root zone.
*Consider fertilizer in late spring (timed to avoid winter nutrient runoff), to compensate for the temporary nitrogen loss caused by wood additions. Compost additions do help, but nutrients may leach over winter.
*Don’t leave mud on the soil surface after planting – this will invite competing weeds. Any bare soil needs to be properly mulched.
∗ Add mulch on top of the soil in a “donut” around the tree with at least two five-gallon buckets of wood chips or rotting woody debris, keeping the mulch from contacting the stem of the tree, with an approximate 4” separation. For plants looking pale green, mulch with a 2” layer of compost topped with 2-4” woodchips in a donut around plants, a “mulch sandwich.”
∗ Well-amended planting holes may only need one or two July-August waterings the first summer, however, monitor and water weekly to monthly, as needed from mid-May to mid-September depending on weather —saturating soil to a depth of one foot (dig into the soil to see how deep your watering has soaked in and adjust your watering times accordingly, knowing that different soils have different saturation rates).
*Slow surface runoff with “terra-forming” to assist winter rain infiltration to delay soil dehydration and “hydro-phobic” soils in summer. Terra forming may be as simple as a “dish” or berm around new plantings, or more elaborate hard-scaping, rain gardens, or terracing. Avoid terra-forming near slide-prone slopes without qualified advice.
*Surface drip irrigation with emitters engineered inside plastic tubing can help plant survival the first summer or two, after which native plants adapted to the Pacific Northwest do not normally require supplemental watering. A low-tech irrigation method is plastic jugs filled with water and poked with a thumbtack to drip-irrigate deeply while allowing time for the fungus-suppressing chlorine in tapwater to dissipate, helping preserve beneficial fungi that has its own water-sharing functions.
*An emergency summer watering for drought-stressed plants in hydrophobic soils may benefit from a one-time addition of biodegradable dish soap (less than a tablespoon per gallon of water) as a surfactant to help water penetrate, inoculating the root zone of a plant (1-2 cups) so subsequent waterings (broadcast or drip lines) will wick to the wet soil and more effectively train roots downward. Spent dishwater can also be useful to penetrate dry soils.
Plant mostly evergreens at groundcover, shrub, and tree levels for weed suppression and stormwater interception.
Also, plant diverse deciduous varieties for wildlife and habitat diversity. Consult: (https://green2.kingcounty.gov/gonative/index.aspx and https://kingcd.org/wp-content/uploads/2023/10/KCD-Native-Plant-Descriptions-2024.pdf) for species suggestions suitable to your sun/shade/wet/dry conditions.
Short list of native evergreen groundcovers:
∗ Salal (can spread – slowly in most sites), Sword fern, Low Oregon Grape, Deer fern, Kinnikinnik, Trailing blackberry (in natural areas): plant 3-5 ft apart. Sword ferns in your yard may be divided in winter (look for ferns with separate fiddlehead clusters). Other herbaceous favorites (not all evergreen, but spreading): Wild ginger, Wood sorrel, native strawberries, Twinflower and Bunchberry (the latter two need well-rotted wood in the soil).
Short list of native evergreen shrubs:
∗ Evergreen huckleberry, Tall Oregon Grape, Pacific Rhododendron, Manzanita, California Myrtle, California Lilac, Silk tassel, common juniper: Plant shrubs approx. 7-10 ft apart for shading effects
Short list of pollinator-attracting plants (to supplement many of the above): Consult https://xerces.org/pollinator-conservation/pollinator-friendly-plant-lists ; and https://www.wnps.org/native-gardening/wildlife
∗ Groundcovers: Oregon Sunshine, Camas, native lupines, Philadelphia fleabane, yarrow
∗Shrubs: Oregon grape, Elderberry, Oceanspray, Ninebark, Ceanothus, Snowberry (spreading),
∗Trees: Cascara, Vine maple, Bigleaf maple, Serviceberry, Pacific crabapple, Oregon oak
Short list of clay-tolerant plants:
∗ Groundcovers: Swordfern, Fringecup
∗Shrubs: Osoberry/Indian Plum, Ninebark
∗Trees: Vine maple, Red alder, Western redcedar
Short list of evergreen trees (for large sites):
∗ Sun: Douglas fir, grand fir, Shore pine, Western White pine, Madrone (by seed is best)
∗Shade: Western red cedar, Western hemlock, Pacific yew, Sitka spruce, grand fir
∗Smaller yards: Mountain hemlock, Shore pine, Pacific yew
• Plant trees seven to twelve feet apart to establish shade (not all will survive. Thin later as needed for appropriate spacing 12-20 feet apart).
• Avoid sewer lines, gas lines, and electrical wires. (Call before you dig: 811; or 800-424-5555; or http://call811.com/)
• Plant in winter, October to March, the earlier/wetter the better.
For best results, the following planting instructions are optimal, but not always practical in remote sites.
Planting instructions for trees:
Smaller bareroot trees, 1-3 feet tall (available from wholesale nurseries or County conservation districts), are cheaper, and grow at a faster rate than larger, root-bound potted trees.
- For best survival, choose bareroot “1+1” or “P1” for optimal size and root-to-crown ratio. Consider field-grown “2-0” conifers with easier to spread primary roots (better long-term structural strength), with perhaps lower survival rates.
- Take care to keep bare roots moist (use a hard jet of hose-water to ensure wet-sawdust contact on roots, in a bucket with drainage holes, and kept in a shady spot with ice during warm spells. Dry-cold spells may require wrapping plants in wet burlap, or “healing in” the entire plant into wet mulch piles.
- Plant out bareroots as soon as possible, soaking first in a mycorrhizal root inoculant (optional), not drowning roots more than 4 hours.
- Take time to observe your planting site and note the conditions. Soil type, moisture, amount of sunlight, and slope are all important considerations. Choose plants accordingly. Often sites will have multiple areas with different conditions, so choose a variety of plants geared toward the diversity of your site.
Careful Planting: Dig 2 or 3 holes such that an untouched mound of soil in the center (volcano) will prevent the root crown from sinking too deep into the hole. Make the holes wide and deep enough for the roots to spread out and go down without "J-roots," wide enough so you don't have to root-prune sensitive growing tips of roots. Put the soil you removed on a tarp or burlap, or better, in a bucket for “mudding in.”
∗ Set the crown of the plant on the mound in the hole (make sure the root crown is at ground level) and spread the roots down and out, the point being that primary roots need spreading for long-term structural stability (potted plants or trees started as test-tube “plugs” can be root bound and floppy). Avoid “J-roots” that double back, teasing crossing roots apart. Plant in the upper foot of soil, in the "sweet zone" that roots seek for both water and oxygen.
∗ Potted root-bound trees may need aggressive cutting and root manipulation, while structural root spread isn’t so important for most shrubs, and hardly at all for groundcovers. Some plant roots need to be handled more gently to retain mycorrhizal inoculants (like Western hemlock) or plants in the Heath family (salal, huckleberries).
∗ Fill the bottom of the holes with a 10% layer of rotting woody debris or wood chips and “mud in” with an approx. 80%soil / 20% woodchip mix, diluting with water for a consistency of wet cement, tapping the mud to get rid of air pockets around the wood chips (liquefaction like cement work). Again, wood in the soil helps build soil structure via mycelium (the fungal body) that supports plant growth, assisting tree survival during summer. A few handfuls of compost mixed in helps plant growth, but is not critical. Too much nitrogen makes plants tasty to pests.
∗ Mycorrhizal root dips, or “Plant Success Tabs” can kick-start beneficial fungi that needs the plant’s photosythesized sugars – a symbiotic relationship. There are mixed reviews about the need for these purchased products. However, transplanting native soils from intact forests can help introduce beneficial microbes. Woody matter and mulch in and on top of soil can help feed and sustain those microbes.
∗ “Mud in” plants only if the soil has high enough sand content to avoid drowning the roots with clay muck. Be cognizant of different soil layers that make up typical residential lots, where native loamy soil may be capped with compacted clay from excavated development. It’s difficult for water to penetrate through clay layers, even if soil below is more porous. A planting hole with uniform backfill may break through layers and make it easier for irrigation water to penetrate the root zone.
*Consider fertilizer in late spring (timed to avoid winter nutrient runoff), to compensate for the temporary nitrogen loss caused by wood additions. Compost additions do help, but nutrients may leach over winter.
*Don’t leave mud on the soil surface after planting – this will invite competing weeds. Any bare soil needs to be properly mulched.
∗ Add mulch on top of the soil in a “donut” around the tree with at least two five-gallon buckets of wood chips or rotting woody debris, keeping the mulch from contacting the stem of the tree, with an approximate 4” separation. For plants looking pale green, mulch with a 2” layer of compost topped with 2-4” woodchips in a donut around plants, a “mulch sandwich.”
∗ Well-amended planting holes may only need one or two July-August waterings the first summer, however, monitor and water weekly to monthly, as needed from mid-May to mid-September depending on weather —saturating soil to a depth of one foot (dig into the soil to see how deep your watering has soaked in and adjust your watering times accordingly, knowing that different soils have different saturation rates).
*Slow surface runoff with “terra-forming” to assist winter rain infiltration to delay soil dehydration and “hydro-phobic” soils in summer. Terra forming may be as simple as a “dish” or berm around new plantings, or more elaborate hard-scaping, rain gardens, or terracing. Avoid terra-forming near slide-prone slopes without qualified advice.
*Surface drip irrigation with emitters engineered inside plastic tubing can help plant survival the first summer or two, after which native plants adapted to the Pacific Northwest do not normally require supplemental watering. A low-tech irrigation method is plastic jugs filled with water and poked with a thumbtack to drip-irrigate deeply while allowing time for the fungus-suppressing chlorine in tapwater to dissipate, helping preserve beneficial fungi that has its own water-sharing functions.
*An emergency summer watering for drought-stressed plants in hydrophobic soils may benefit from a one-time addition of biodegradable dish soap (less than a tablespoon per gallon of water) as a surfactant to help water penetrate, inoculating the root zone of a plant (1-2 cups) so subsequent waterings (broadcast or drip lines) will wick to the wet soil and more effectively train roots downward. Spent dishwater can also be useful to penetrate dry soils.
Step 5
Maintain, monitor and adjust
*Keep the weeded area around the tree mulched with leaves, wood chips, or woody debris, leaving a four-inch radius around the tree stem mulch-free.
Replant bare areas from plant mortality to avoid re-population with weeds, and troubleshoot to see if the area needs more mulch on or in soil. Weed re-infestations often stem from a lack of mulch or shade conditions, so again, prioritize native evergreen trees, shrubs, and groundcovers, adjusting “right plant, right place” to thrive in your soil type, moisture, and amount of sunlight.
Maintain, monitor and adjust
- Maintain “sunlight cones.”
*Keep the weeded area around the tree mulched with leaves, wood chips, or woody debris, leaving a four-inch radius around the tree stem mulch-free.
Replant bare areas from plant mortality to avoid re-population with weeds, and troubleshoot to see if the area needs more mulch on or in soil. Weed re-infestations often stem from a lack of mulch or shade conditions, so again, prioritize native evergreen trees, shrubs, and groundcovers, adjusting “right plant, right place” to thrive in your soil type, moisture, and amount of sunlight.
Misc. Notes
Thank you (!) for making our environment healthier for fish, wildlife, and us.
- Ask your local nursery to stock native plants, or order inexpensive bareroot plants from your local conservation district (kingcd.org). These are available for planting during winter dormancy, but consider potting bareroot plants and nursing them over summer for added growth, the planting them in Oct/Nov to take advantage of fall root establishment. Carefully potting up your own bareroot plants ensures better root-spread, rather than typical root-bound nursery plants.
- Boot hygiene: be aware that you and restoration professionals could spread invasive seeds stuck in boots or tire treads. Boot picks, or a screwdrivers and brush should be used upon entry and exit of sites, even between infestations to avoid “connecting the dots.”
- Plant cuttings: “Live-stakes” are an excellent source of diverse native shrubs for wildlife: Willows, snowberry, elderberry, Red Osier Dogwood, ninebark, salmonberry, Indian plum, even Red Flowering Currant. Adding rooting hormones may help, but are usually not necessary. Cut 2-4 ft stems (thick ones have more energy reserves) when the shrub is dormant (Jan/early Feb cuttings avoid drying in winter freezes), but before early warm spells that “break bud” and suppress rooting potential. Keep cuttings moist with ice on wet burlap and plant out asap after harvest. Poke the stems, at an angle, 12+ inches into the soil to maximize stem contact with the rooting zone of the soil, or pound straight down in sandy soil. Stomp soil to seal the soil/cutting interface so developing roots don’t dry out.
- Continue to spread woody debris—logs, branches, wood chips —to improve the soil’s fungal food-web that will nurture new plantings and improve the forest sponge. Be cognizant of smaller branches without soil contact that can be kindling fuel in fire-prone areas. After a utility check, woody debris can be buried in a swale (raingarden), with nurselogs radiating out from this water reservoir to act as live mycelium-wicks to share water with adjacent planting areas. Logs can be split lengthwise in two, placing the flat side for better soil contact, and leaving the bark intact as cover for soil critters. On larger sites, “pioneer species” (willows, alders, cottonwoods) can be grown to restore soil and create future woody debris, to be felled at appropriate sizes, aiming for wetland/riparian reservoirs to "hydraulically redistribute" moisture via fungal networks. Retain roots in the ground and trunks as wildlife “snags” at 6+ feet, taller if safety is not an issue.
- Plant more “detail species” (diverse native herbaceous species) after evergreen “workhorses” establish shade conditions, and after woodchip mulch improves soil.
Thank you (!) for making our environment healthier for fish, wildlife, and us.